- Tabel Addressing / Tabel Addressing
- Learning Objectives / Tujuan Pembelajaran
- To know the meaning of NAT. ( Untuk mengetahui arti dari NAT ).
- To know how to configure RouterBoard, so that it can connect to the internet. ( Untuk mengetahui cara konfigurasi RouterBoard, supaya bisa konek ke internet ).
- Basic Concepts / Konsep Dasar
- Network Address Translation or better commonly referred to as NAT is a method to connect more than one computer to the Internet network using a single IP Address. Many use this method due to the limited availability of IP Addresses, the need for security, and ease and flexibility in network administration.
- Network Address Translations atau yang lebih biasa disebut dengan NAT adalah suatu metode untuk menghubungkan lebih dari satu komputer ke jaringan internet dengan menggunakan satu alamat IP. Banyaknya penggunaan metode ini disebabkan karena ketersediaan alamtat IP yang terbatas, kebutuhan akan keamanan, dan kemudahan serta fleksibilitas dalam administrasi jaringan.
- Configurations / Konfigurasi
- Step 1, enter the IP Address "ether1" and "ether2", the same way are distinguished only "IP Address" and "Interface".
- Langkah 1, isikan IP Address "ether1" dan "ether2", caranya sama saja yang dibedakan hanya "IP Address" dan "Interface".
- Step 2, then enter the IP Gateway.
- Langkah 2, lalu masukkan IP Gateway.
- Step 3, then enter the IP DNS. Here i am using IP : 202.43.178.245.
- Langkah 3, setelah itu masukkan IP DNS. Disini saya memakai IP : 202.43.178.245.
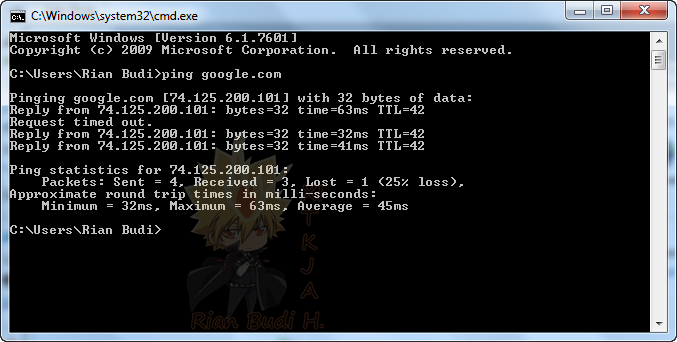
- Step 4, and then try to do PING to google.
- Langkah 4, lalu coba lakukan PING ke google.
- Step 5, then enter "firewall nat", "firewall nat" is to make the IP Address translation of RouterBoard for use in the Client.
- Langkah 5, setelah itu masukkan "firewall nat", "firewall nat" adalah untuk membuat translasi alamat IP dari RouterBoard untuk digunakan di Client.
- Step 6, and then we are to client, enter the IP Address, and the "Default Gateway" using IP Address "ether2". Actually, in the "Preferred DNS Server" can also use the IP Address "ether2".
- Langkah 6, lalu kita ke Client, masukkan IP Address, dan pada "Default Gateway" memakai IP Address "ether2". Sebenarnya di "Preferred DNS Server" bisa juga memakai IP Address "ether2".
- Step 7, and then try to do PING to google, if succesful means that you are already connected to the internet.
- Langkah 7, lalu coba lakukan PING ke google, jika berhasil berarti anda sudah terhubung ke internet.


0 komentar:
Posting Komentar